
Harvesting and Drying Alma Paprika
Hello friends,
This is our second year growing alma paprika plants. It's really satisfying to sow them as little tiny seeds, see them grow up into seedlings, and then onto big pepper plants with red peppers that you can dry into mild paprika.
The process for growing alma paprika plants is pretty much the same as any other capsicums or chillies. The seeds need to be sown in late winter, at the same time as tomatoes, and they need consistent steady heat in order to germinate. At that time of the year we have them sitting in the dining room where we have the fire going each day. Within a couple of weeks they germinate, and slowly over a couple of months they grow into seedlings which need to be potted on.
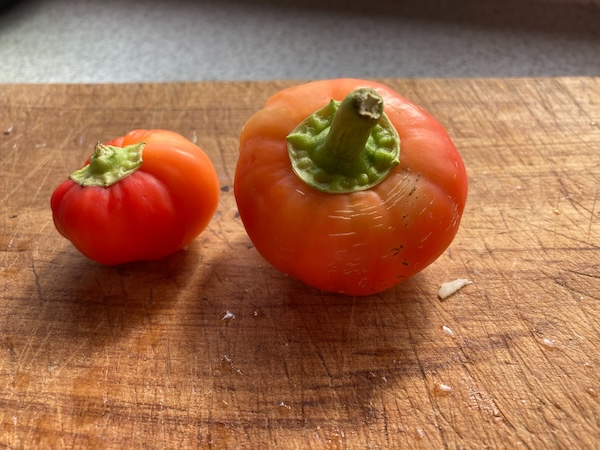
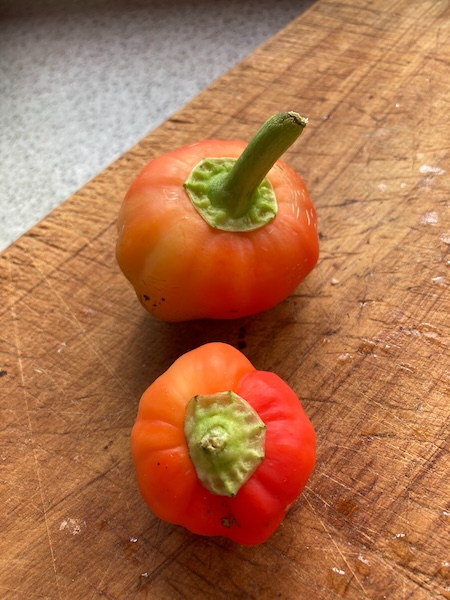
I move the alma paprika seedlings into the glasshouse in early October, and once it gets to Labour weekend, it's time to plant them into the ground in the glasshouse. Over the next few months they get bigger, and need staking, and at around Christmas they begin to flower. The rounded alma paprika fruits begin to grow, and then it's a wait over late summer and early autumn for the growing fruits to begin to change colour to a bright red hue.
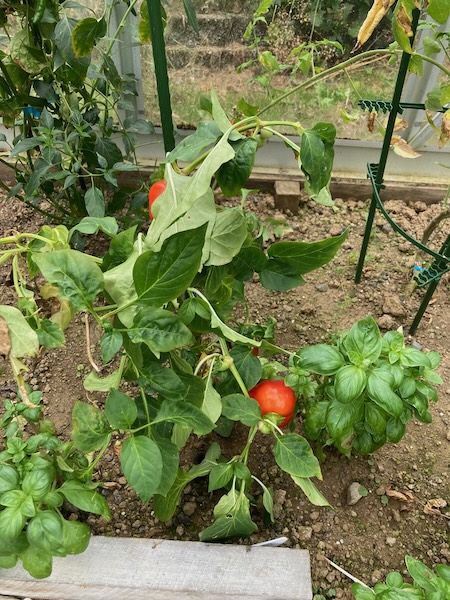
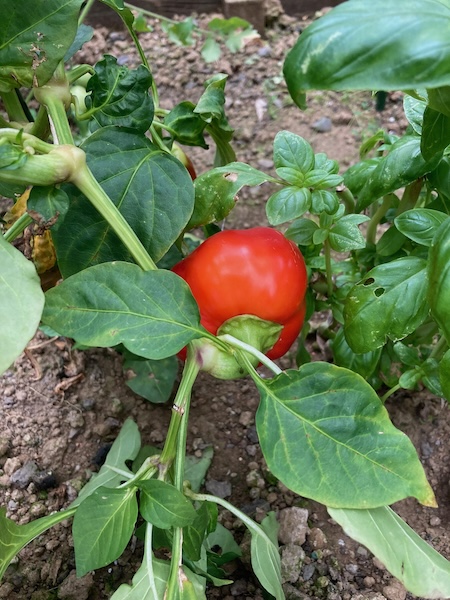
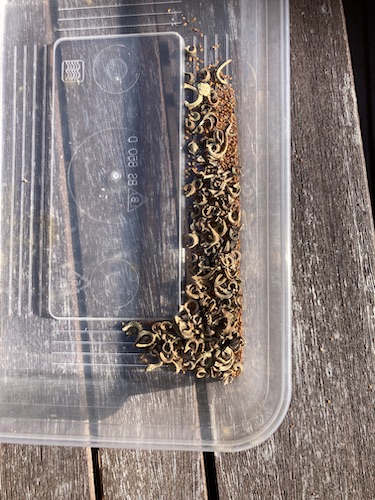
Once the alma paprika fruit has turned red, it's finally time to pick them. I cut them off the plant using a pair of secateurs, and then take them into the kitchen to begin processing them.
After chopping them in half, cutting off the stalks, and removing all the seeds, I slice the alma paprika fruit into thin slices and lay them out on a tray.
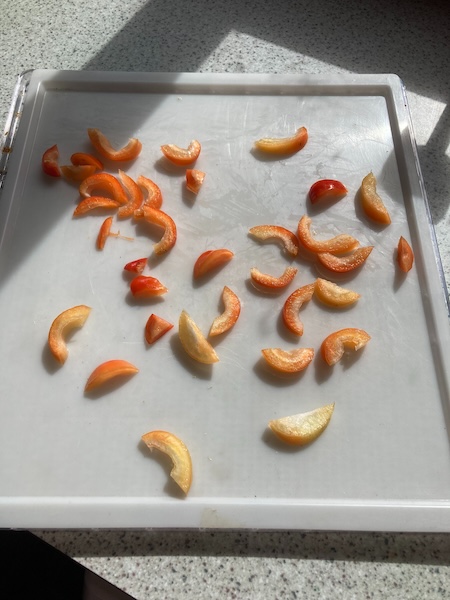
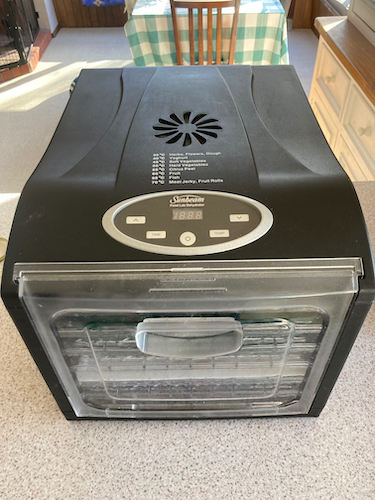
Then they go straight into the dehydrator at 35˚C, and I dry them until the slices are bone dry and brittle, ready for turning into paprika powder.
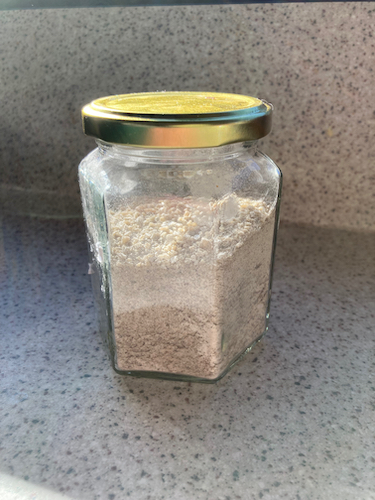
After a quick whizz in our spice grinder, the paprika powder is ready to use in cooking. The spice is tasty and mild, and works great in a number of dishes. The whole process is really easy, and satisfying, so it's now yet another yearly thing for me to do in the garden and kitchen.
Do you have any yearly tasks you enjoy? There's great satisfaction in accomplishing them when it means you have tasty food over the cold winter season.
Have a wonderful day
Julie-Ann
Want to discuss my post? Feel free to chat with me on Instagram or Mastodon or Bluesky.
Spring Seed Sowing Week 2
Hello friends,
It was a busy week seed sowing for Spring. I like to sow a mix of vegetable, herb, and flower seeds each week, so no individual job is too big at any one time.
Vegetable Seed Sowing this week:
- Pearl Drop Onions (for pickling)
- Italian Long Keeper Onions
- Pukekohe Long Keeper Onions
- Long White Spring Onions
- Santana Spinach
- Space Saver F1 Cabbage
- Summer Sprouting Purple Broccoli
- Coastline Lettuce
- Drunken Woman Fringed Lettuce
- Rocket
Herb Seed Sowing this week:
- Gigante Italian Parsley
- Celery for Cutting
- Soapwort
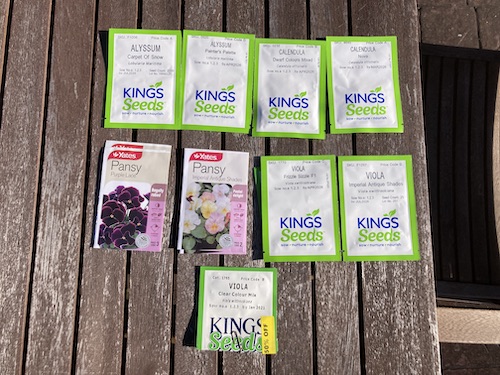
Flower Seed Sowing this week:
- Alyssum Painters Palette
- Alyssum Carpet of Snow
- Pansy Imperial Antique Shads
- Pansy Purple Lace
- Viola Clear Colour Mix
- Viola Frizzle Swizzle
- Viola Imperial Antique Shades
- Calendula Dwarf Colours Mixed
- Calendula Nova (herbal variety)
- Snapdragon Potomac Lavender
- Statice Apricot
- Night Scented Stock
- Spring Sparkle Stock
- Allium Purple Sensation
- Allium Showy Persian Onion
I have super easy way of seed sowing annual flowers, a cheat way really. I have a lot of self seeded annual plants in my flower garden beds, and I keep an eye out in late winter to see when plants like calendula, pansies, and alyssum start germinating. Once I see that the ground is warm enough for that to happen, it's time to sow annual seeds.
I gather all my annual seeds, and start opening all the packets. Here is where the lazy part is, I dump all the seeds into one container. And once all the seeds are mixed in all together I go out into the garden and start sprinkling seeds around where I want my annual plants to grow.
Within a couple of weeks all the annual seeds start germinating, and since I know what the seedlings all look like, I know not to weed them out of the ground. It may be lazy, but it saves me heaps of time in not having to sow each seed out by hand. I also like the wild, non structured feel of where the plants grow, as compared to all my other plants in the garden.
I have also just popped all my poppy seeds into the fridge to vernalise for two weeks. After that I will sow those seeds in a similar manner. I already have poppy plants that have self seeded into the garden as well, but I wanted to add even more coloured varieties this year.

How is your seed sowing going? With sunrise coming at least a minute earlier every single day, I can just feel the coming of Spring deep within my bones. The sky is no longer dark when I wake up in the morning, and I look forward to seeing the sun pop over the hills as I make breakfast each morning.
Have a wonderful day
Julie-Ann
Want to discuss my post? Feel free to chat with me on Instagram or Mastodon.
Spring Seed Sowing Week 1
Hello friends,
We're now into the last month of winter, and it's finally time to start sowing seed for spring. It's a tricky time of the year, as it's possible to get snow here in Dunedin even into the first week of October, so there's nothing worse than sowing seeds too early, and then having to try and keep them alive if there's a late frost or snow in early October. Last year we had snow laying on the ground the first week of October, and a couple of frosts the weeks after that, so it was a stressful time trying to keep all my seedlings alive, looking after my growing potato plants, as well as my new dahlias which had just popped out of the ground. Seedlings don't get transferred outside and into the vegetable garden until Labour Weekend, which is the third weekend of October, so that's a long way off right now.
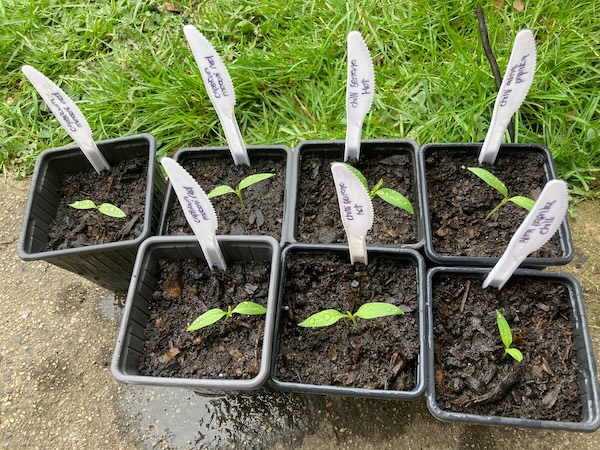
I have a specific order in which to germinate seeds, so that I don't have too many plants sitting in the glasshouse for such a long period of time. The first seeds sown are my tomato plants. I grow enough plants for our own needs, but also for family members as well. I usually have at least 12 plants growing in our glasshouse, and poke any others that are spare in free space I have in the vegetable garden. We eat a lot of tomatoes fresh throughout the summer, but the bulk of it is frozen away for using in autumn and winter cooking.
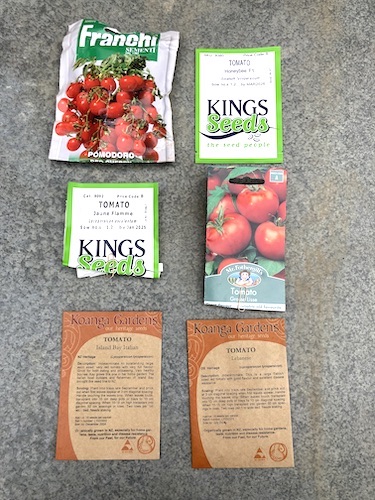
This year I'm growing the following tomato varieties:
Franchi Sementi Pomodoro Red Cherry - A red cocktail tomato with great taste. This is no longer for sale in New Zealand, I save this seed every year.
Kings Honeybee F1 - I haven't tried this one before, I wanted to try another cocktail tomato, we'll see how this goes. One of my sister's grows her tomatoes outside, and it's far easier to ripen smaller tomatoes in Dunedin's short summers.
Kings Tomato Juane Flamme - Our favorite tomato, an orange tomato with the best taste of any tomato I've ever grown.
Tomato Grosse Lisse - A beefsteak tomato that was a favorite of my grandfather. The best tomato for putting a slice on a hot piece of toast, and eating it with a pinch of salt on top.
Tomato Island Bay Italian - I haven't grown this tomato variety before, but I've heard good things about it. Good for eating fresh and processing apparently.
Tomato Lebanese - Also a new tomato variety this year, I'm hoping it will have good disease resistance, and tastes good too.
The next seeds to be germinated are my chilli and capsicums plants. I've successfully grown chillies in our greenhouse, but I haven't had any luck with the big traditional bell pepper capsicums.
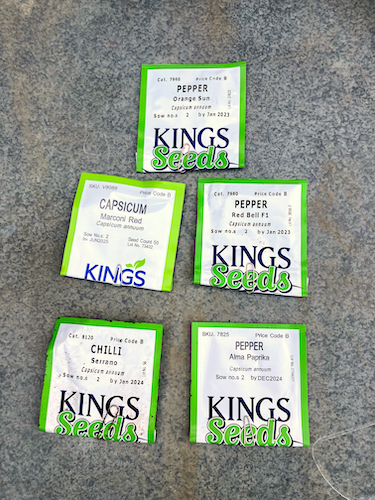
This year I'll be growing the following chillies and peppers:
Chilli Serrano - I had a huge crop of chilli last season, so I'm growing this variety again.
Alma Paprika Pepper - Trying once again to grow my own paprika. Last season they didn't grow as well as I hoped, am trying again for the last time.
Capsicum Marconi Red - A prolific sweet Italian variety. I'm hoping that it's narrow shape will mean it ripens faster.
Capsicum Orange Sun - My last attempt at growing a bell pepper variety.
Capsicum Red Bell F1 - Also another last attempt at successfully growing a bell pepper variety.
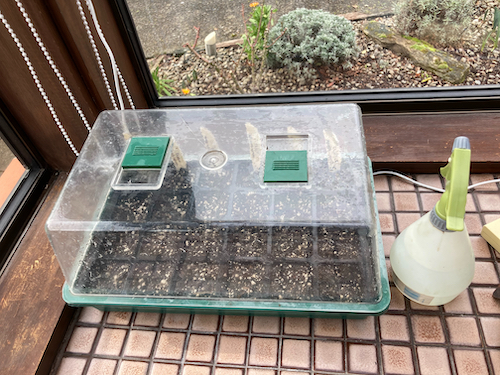
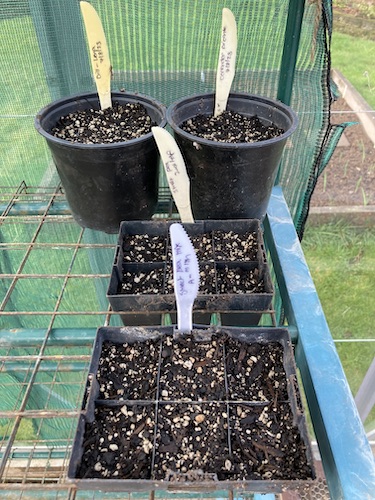
The tomato and chilli seeds were sown into two mini greenhouses, and placed in a warm sunny spot in our dining room. It's warm in there on sunny days, and also thanks to the benefit of our wood burner being in that room, they're kept warm in there every night in winter. I'm eagerly waiting for the seeds to germinate.
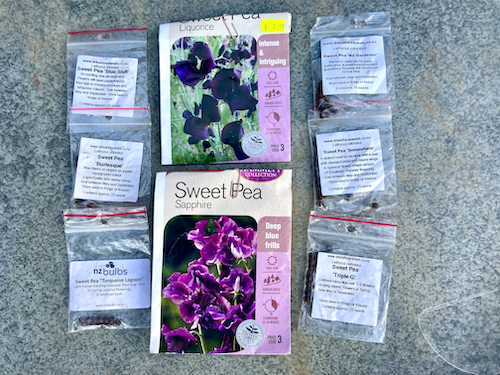
The next seeds to be sown are all my sweet pea varieties. I've collected quite a lot of Keith Hammett varieties over the years, he's a New Zealand breeder who produces the most stunning sweet peas. Sweet peas germinate in cool temperatures, so they are now potted up and put into the glasshouse.
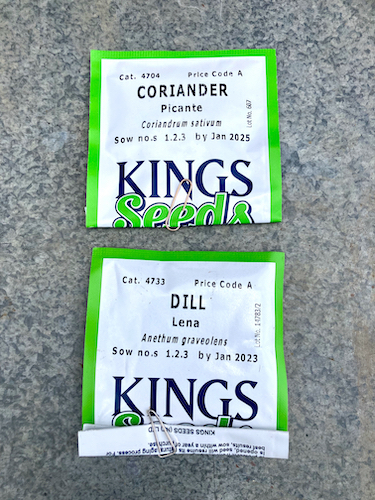
The last of the seeds to be sown for now are the herbs coriander and dill. Coriander prefers to grow in cool temperatures, otherwise they will bolt, so I sow one lot in late winter, and another in early autumn. They don't like to have their roots disturbed while planting into the ground, so I sow a bunch of seeds into a biggish pot, and then when it's time to transfer them into the herb garden, I plant the whole container worth in one spot, I don't separate out the seedlings at all. For the dill seeds I do the same thing as with the coriander, it ensures I get a relatively big crop of leaves without the problem of using up a lot space.
The sweet peas, coriander, and dill are all now sitting in my glasshouse. We're were expecting snow down to 200 m last night, so I've put off doing any more seed sowing tomorrow. Hopefully soon they will be joined by a lot more seeds as the month goes on.
Have you started seed sowing yet? I'm interested in what choices you've made for the coming growing season.
Have a wonderful day
Julie-Ann
Want to discuss my post? Feel free to chat with me on Instagram or Mastodon.
Making Sugar from Homegrown Sugar Beet
Hello friends,
As you may know by now I like growing new varieties of fruits and vegetables, and the more unusual the better. Over the past couple of years I've grown Sugar Beet, with the hope to try and process my own sugar. Here in New Zealand we get all our commercial sugar from sugar cane grown in Queensland, Australia, but elsewhere in the world (including the USA) sugar is made from sugar beet.
Up until this year it was possible to buy sugar beet seeds from Kings Seeds, but they no longer sell any at this time. Sugar beet are very closely related to beetroot, and are grown in the same manner. It's best to sow them in later winter/early spring directly into the ground. Each "seed" in the packet is actually made up of 8 seeds, which grow very close to each other. After the seeds have germinated and come up from the soil, it's a good idea to pull out any that are too close together, and replant them further apart to maximise your sugar beet crop.
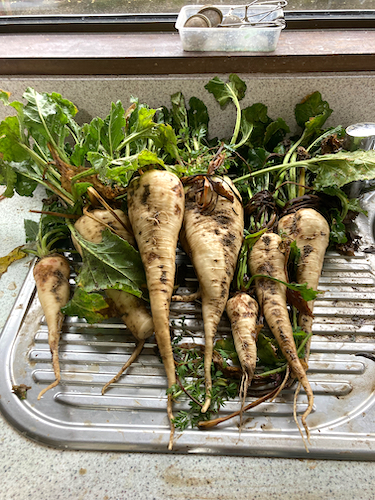
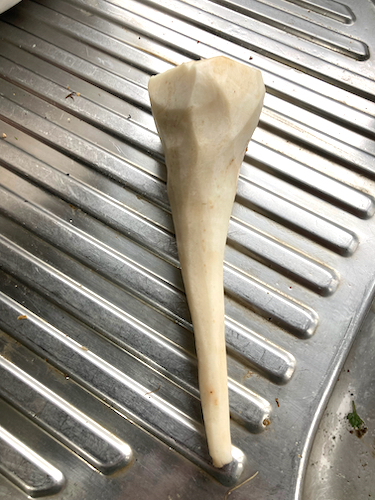
After that, the sugar beet plants are very easy to take care of. I watered them infrequently over the hot summer months, and come autumn, after the first frost, they're ready to harvest. As with parsnips and carrots, sugar beet are sweeter after a frost. With a garden fork it's pretty easy to pull them out of the ground. The top of the plants look like beetroot plants, and the roots of the plants look similar to parsnips.
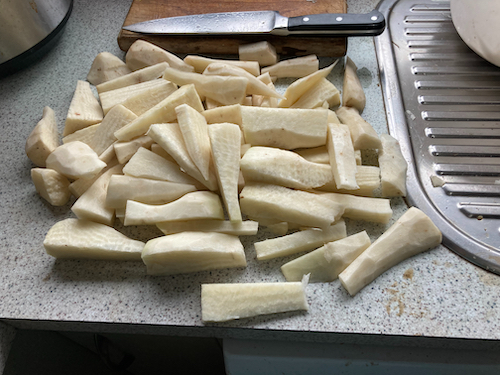
Once in the kitchen, the first step is get all the dirt off the roots by washing and scrubbing, and after that it's time to peel the sugar beet roots themselves. We just used a regular vegetable peeler, and then cut the tops off the sugar beet roots with a sharp knife.
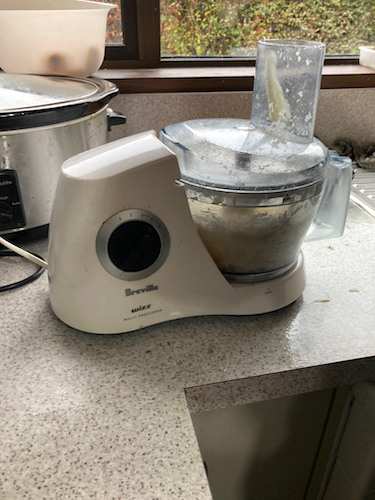
The next step is to prepare the sugar beets for grating using a food processor. We cut them into smaller chunks that would be easy to feed down the shute of the food processor. With a food processor grating the sugar beet on a rough setting took only minutes, but doing it the old fashioned way by hand took an hour (I did this in previous years). At this stage of the process we had 2 kg of sugar beet roots.
With this done, it was time to cook the sugar beet. The first year we made sugar from sugar beet we used this blog post as a guide. But this method is very labour intensive, and we burnt the sugar from the sugar beet while drying it down.
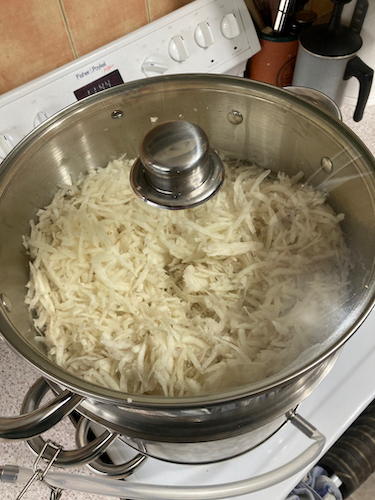
However, this year, we had a secret weapon, our brand new, handy dandy, steam juicer. Before the harvest, I had spent weeks coming up with this idea of extracting the sugar from the sugar beet using the steam juicer. Steam juicers are great for extracting juice from fruit and veges using the power of steam. You put your fruit or vegetable of interest in the top compartment of the steam juicer, add water to the bottom compartment of the steam juicer, and turn on the stove. The water heats up in the bottom compartment, and the steam rises up to the top compartment through a whole in the middle compartment. The steam cooks and softens the fruit or vegetable in the top compartment, and the cooled juice drops into the middle compartment to collect. From there, there is a spout to siphon off the collected juice at the end of the steam juicing. It's an ingenious system of juicing a big range of fruit and vegetables, and I use it a lot for making blackcurrant juice in summer, and apple juice in autumn. If you're interested in buying one in New Zealand, Netropolitan sells them infrequently when they bring them into the country. I had to wait over a year to get our one.
The steam juicer guide suggested that 1 hour of heating was good for extracting juice from beetroot, so I used that as a guide for steam juicing our grated sugar beet. The sugar beet went into the steam juicer, and an hour later the sugar beet juice had collected in the middle compartment of the steam juicer. After checking the sugar beet in the top compartment, is was soft and cooked.
After siphoning off the sugar beet juice in the steam juicer, we filtered it through some cheese cloth to remove any solid bits of sugar beet. The left over sugar beet in the top of the steam juicer was still quite wet, so we also put that through the cheesecloth and squeezed as much juice out of it as we could get. Hubby mumbled something about getting a cider press at this point to make the job easier, but that seemed a little extreme to me...
The thing about sugar beet juice is that it isn't the nice pristine white colour you would be expecting from sugar. Normal sugar is highly processed to remove all the impurities in order to get pretty white sugar that looks the most appealing. Sugar beet juice is a brownish colour, similar to molasses, and without a centrifuge and other commercial processes, it's just not possible to get sugar that is pure white. Since we use our sugar beet sugar in baking and cooking, the brown colour doesn't bother us at all.
The next step in processing the sugar beet to get sugar, is to decrease the volume of liquid in the juice. All the sugar beet juice was transferred into a pot, and it was brought up to a simmer. The more water that comes out of the juice, the more syrupy the juice gets. You need to pay attention to it, otherwise you could remove all of the water, and burn the sugar beet molasses (I know this from experience last year).

When you get the sugar syrup to a stage you are comfortable at, it's time to take it off the heat. There are two methods at this stage to remove the last of the water, either pour it into shallow trays to dry slowly over time, or bring out the dehydrator, and get it to do all the work for you in a much shorter period of time. I decided to bring out the dehydrator. The aim in the drying is to try and get sugar crystals to form, and the best way to do this is to actually seed the cooled sugar syrup with a sprinkling of sugar crystals. I haven't figured out this step totally yet, so I just got a small amount of sugar and sprinkled it on top the sugar beet syrup.
The dehydrator doesn't have an exact setting for dehydrating sugar syrup, so I chose the fruit leather setting which is set to 70˚C. The sugar syrup was poured onto dehydrator silicone sheets with a lip around the entire edge, and put into the dehydrator. After a total of 5 hours, the sugar beet sugar in the trays had dried enough to lift the sugar from the flexible silicone sheets.

The sugar was still sticky in the middle and bottom layers at this stage, so I broke the sugar up into smaller pieces and spread them out evenly over the silicone trays to dry further. After a further 5 hours, the sugar was completely dry. When broken, the sugar cracked.

The last step in making sugar from sugar beets is to break the shards of sugar into smaller pieces. At this stage I brought out my Breville Coffee and Spice Grinder and filled it up with the sugar shards, and broke them down into smaller pieces. I use the grinder all the time to process all of our dried herbs and spices, and it has a handy removable stainless steel bowl for cleaning. It is quite often on sale, so no need to buy it at full price if you're after one for yourself.

I repeated grinding all the sugar into smaller pieces until all the sugar shards had been turned sugar.
The final weight of the sugar extracted from our sugar beets was 162 grams from 2 kg of roots, which equates to a sugar content extraction of 8.1%. Sugar content extraction in sugar beets can vary anywhere from 12 - 21% according to Wikipedia using commercial processes, so I think that 8% is good for us as home growers. I think we could have gotten the number higher if we had a fruit press like hubby had mentioned, but that is a bit extreme I feel for the average home grower. The other thing to consider is when to harvest the sugar beet. Due to health issues this year, we harvested it later in the season compared to other years. It's possible that some of the sugar beet had been used up already by the plants prior to harvest.
And what does sugar beet sugar taste like? Well, it tastes like sugar, it's nice and sweet, but it has a taste reminiscent of barley sugar. Our plan is to use the sugar in baking our Christmas Cake this year. We did this last year, and no one who ate the cake noticed anything different from previous years.
As for the coming growing season, what is our plan sugar beet wise? Well thanks to some lovely people in some Facebook NZ seed swapping groups, I've been given some sugar beet seeds from their Kings Seeds packets that they still had spare in their stashes. Our plan is to grow these seeds on to develop our own big stash of sugar beet seeds for growing on in years to come. I'll also pass on some of these seeds to other people want to do the same. As sugar beet plants are biennial, it will take two seasons to happen, from there we can grow sugar beet every year and collect more seed.
I hope that you have enjoyed this in explanation of growing, harvesting, and processing of sugar beets to turn into sugar. Feel free to ask any questions on my social media about this, and I'll try to give you answers. I'm also interested if anyone has any suggestions to streamline this process any further.
Have a wonderful day
Julie-Ann
Want to discuss my post? Feel free to chat with me on Instagram or Mastodon.
The 2023 Kings Seeds Catalogue Has Arrived
Hello friends,
Down here in Dunedin, we are currently in the depth of winter. The winter solstice may have been a month ago, but now is the coldest time of the year for us, and will probably stay that way until late August at least. If it's not freezing cold and sunny, it's gray and rainy and soggy (and also still cold). Both outcomes mean not much can be done in the garden at the moment, on frosty days the ground is frozen solid, and on rainy days the garden is very squishy.
My frustration at not being able to get into the garden due to the weather has been made worse by me having minor toe surgery two weeks ago which has turned complicated thanks to an infection (as always, sigh). At the moment I can't fit my bandaged toe into any shoes (well apart from jandals), and if that wasn't bad enough, I'm not allowed to get my bandage and toe wet at all which would totally happen if I attempted to wear jandals in the garden right now. This pretty much means I have been confined to inside my home since the surgery, well apart from when I have to go to the doctors to get my dressing changed.
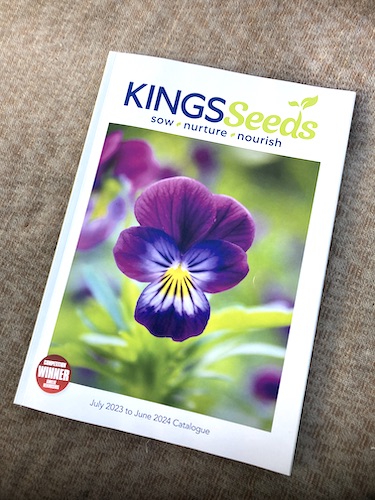
Just when I began to feel a little down about all this, one of the most exciting gardening days of the year happened, the arrival of the 2023/2024 Kings Seeds Catalogue. There's nothing like ripping open the packaging, sniffing that new magazine smell, and then flipping through the pages to see what seed goodies are available this year.
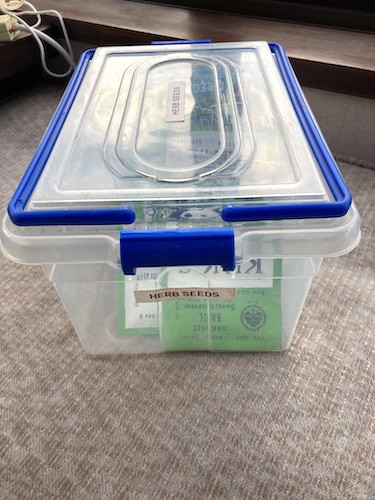
The first responsible thing to do though is to go through my current flower, herb and vegetable seed stashes and see what I have, there's no point in buying seed when I have plenty stored away already. My seed stashes are split into three sections, flowers, herbs, and vegetables. The flowers and herbs seeds are in disorganized chaos inside some plastic tubs.
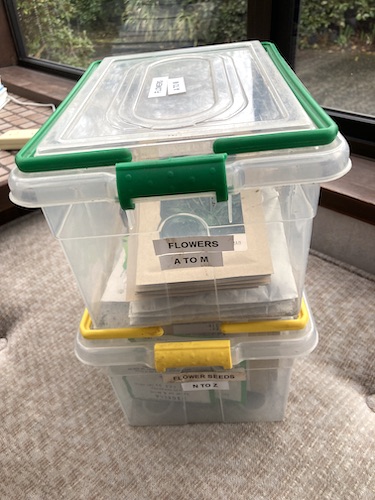
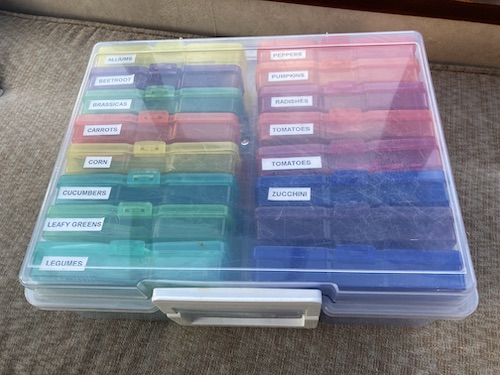
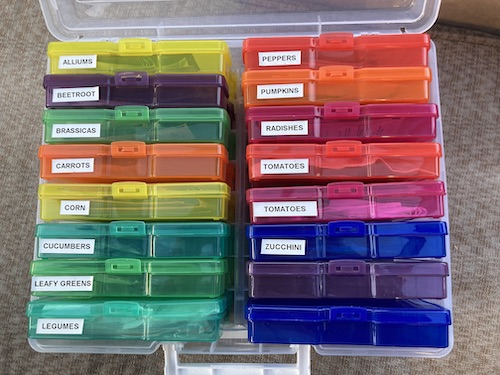
The vegetable seeds however are meticulously organized in a craft storage box from Spotlight. It has lots of small containers which I use to separate the vegetable seeds based on each vegetable type. And thanks to my handy dandy label maker I know exactly which container is which. I also use the coloured boxes to match each vegetable type, and this makes it super easy to find the corn and carrot boxes for example.
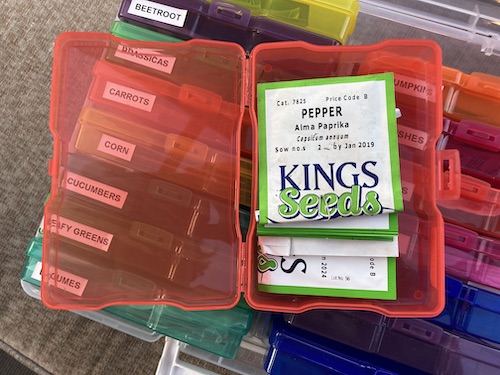
After I pull out each box I open my garden seed database and check each seed packet, and their use by date, and update the database accordingly. If any seeds are low, or finished, I highlight the database to show which seeds I need to reorder. My database also includes a section to show what times of the year the seed can be sown, and when it has been sown. It's been very handy over the years as long as it's been kept updated.

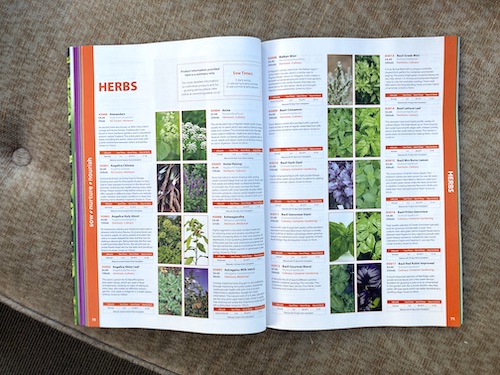
Once that is completed, it's time to browse the Kings Seeds catalogue. On the first go through I highlight all the things I need, and those that I want. I let myself go wild. After that is done, I knuckle down and make post it notes lists. This list is more focused, and I make a point of deciding things like if I do really need three different varieties of calendula...
After that, the next step is going onto the website. First of all I add stuff to the cart that we absolutely really need. After that I narrow down the other stuff I want and put it in the cart. Sometimes the seeds that I need and want appear in the Kings Seeds shopping rewards list (they have a system where after you spend a certain amount they give you free seed packets). Then I tend to juggle the cart based on if some of my seeds will end up on that list, there's no point wasting money on what will be free seeds.
After all that is done, and I've justified to myself every seed packet in the cart, it's time to pull out the credit card and pay for all my precious seeds. And then the waiting at the letterbox begins...it's nearly just as exciting sorting through all the new seed packets when they arrive.
Are you buying and growing any new varieties of plants this year in your garden? Do you have a seed database like I do? I'd be interested to find out.
Have a wonderful day
Julie-Ann
Want to discuss my post? Feel free to chat with me on Instagram or Mastodon.
Social Media


Archives